When I was home for the July 4th holiday, my brother gave me two old windows that he had saved from the trash. (He's a contractor and knows I love old stuff so he rescues things for me that his customers ask him to throw away!)
I decided I wanted a new cabinet for my craft room, so my husband and I worked together to design and build the one you see above using the old windows for doors. Neither of us are builders (this is the 1st piece of furniture we've ever built), so I'm not sure how "properly" it's put together.....but I LOVE it!!!
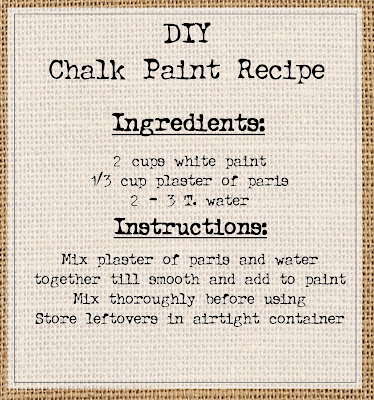
I painted all the boards (and the windows) with a homemade chalk paint and then sanded them to give them a distressed/old look. (As a side note: I left the smears of paint from the original owner on the glass because I thought it added more charm and a bit of nostalgia to the piece.)
Instead of using the light finishing wax that I usually use on my chalk painted furniture, this time I used the dark. It added just the right touch and made my new cabinet look like something out of an old farmhouse! (The photos don't really do it justice -- but they give you a good idea of what it looks like.)
In the past few years my tastes and styles of decorating have changed. I'm becoming sentimental and learning to love antiques and old farmhouse style stuff. I've updated several pieces of furniture to that style, and have started collecting antique decor whenever I can find it for a good deal. That being said, I wanted to update a few things in my craft room to match my new cabinet.
I updated the above frame by adding a chicken wire back and dry brushing over the black frame with a "warm buff" paint. I changed up the photo with a vintage style collage using portions of the old and adding in some new! I kept the burlap square, coffee stained doily, and vintage lace piece and added: 1. coffee stained paper doily 2. old dictionary page, vintage photo card (Tim Holtz), and a small cameo.
I also up-cycled a tin can by covering it with a piece of muslin fabric and adding a strip of burlap ribbon.
The can is now sitting on my desk with my most used tools - scissors, small paintbrushes, stylus, paper piercer, craft knife, bone folder, stencil brushes, etc.
Hope you've enjoyed this mini decor update -- I'm enjoying the fresh look and feel it gives my craft room.
This post linked to:
Stamps and Stencils - Color, Texture, Shape
Really Reasonable Ribbon - Anything Goes with lace/trim/ribbon
Word Art Wednesday - Anything Goes


5 comments:
Wow!!
I love your cabinet, I have some old windows waiting for a good project and your idea is wonderful!!
Thanks for sharing.
Love from Spain.
What fun! Congratulations on your first piece of furniture! I love it too. You're craft space is so organized. I'm a tad jealous. I've been working on getting my things organized. Thanks for sharing this beautiful space with your readers. ~ Abby
Your new furniture piece is gorgeous! Thanks for sharing the chalk paint recipe, too. I love your upcycled frame and pencil holder. The texture and composition are wonderful. Enjoy your new crafty space! Thanks so much for sharing with us at the RRR Anything Goes with Ribbon or Trim Challenge!
Love your up-cycled frame with chicken wire! Gorgeous. Thanks for playing along with Really Reasonable Ribbon Anything Goes Challenge.
Oh where to start! Well firstly, your cabinet is a total triumph ! How lovely for you and your husband to work on such a fabulous project together. Secondly your frame is gorgeous . Love the shabby chic look. Thank you for joining us over at Stamps and Stencils. Toni x
Post a Comment