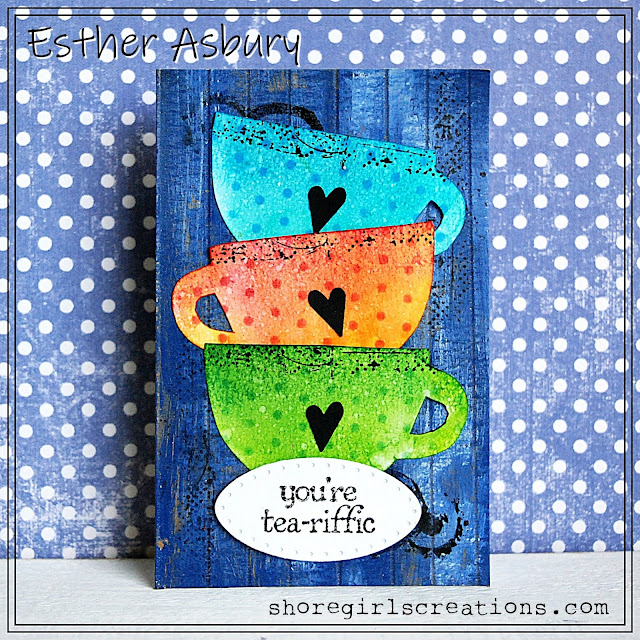
I'm having a blast playing along in the Spring/Summer Coffee Lover's Blog Hop!
I have a second card to share today that features a fun DIY weathered wood background.
I have a second card to share today that features a fun DIY weathered wood background.
Here's a mini tutorial ...
- Gather your supplies - White Glue, Paint, Stiff Cardboard, Sandpaper
- Cut your cardboard to size and using a Scoring Board, create boards every 1/4 inch
- Cover your entire piece of cardboard with white school glue and let dry till tacky
- Paint over your tacky glue with your choice of paint (I used Blueprint Sketch Distress Paint ---- (NOTE: do not apply using applicator, remove lid and use a paintbrush!)
- Dry using a heat gun (if you did it correctly, cracks will appear)
- Add a coordinating color of paint and heat set (I added Hickory Smoke Distress Paint)
- Apply a little bit of Picket Fence Distress Stain and rub in with your finger (heat set)
- Re-score your lines
- Sand edges and center to create a rough, worn look
Here's a free template for the cup I used as well.
If you'd like the saucer to go with it visit my Patterns and Templates Page.
Supplies and Tools:
- Blueprint Sketch/Hickory Smoke Distress Paint (Ranger)
- Picket Fence Distress Stain (Ranger)
- Sandpaper
- Cardboard
- Elmer's Glue
- Martha Stewart Scoring Board
- Mixed Media Grunge (Stamplorations)
- Heart Punch
- Polkadot Stencil (Firefly)
- Latte Love - Fiskars
- These colors of distress ink (Ranger)
- Mermaid Lagoon, Peacock Feathers, Spiced Marmalade, Picked Raspberry, Mowed Lawn, Pine Needles
The teacups were cut from watercolor paper and painted in coordinating distress inks before adding some polka-dots with a stencil.
This post linked to:
Spring/Summer Coffee Lover's Blog HopStamplorations Mixed Media Challenge - Must use a stencil
Mix It Up - Anything Goes + optional Mixed Media
The Paper Players - Life is Better with Friends


24 comments:
Beautiful stack of cups on your card and I love the fantastic colors too.
Thanks for the tutorial, Esther. I may just try this one!
Your BG came out really beautiful and looks just like wood.
Awesome card.
I LOVE this! Pinned it to make it later! tfs
Thanks so much for the tutorial and the teacup freebie! Great colors and card.
Wow, gorgeous Esther. That background is amazing and I love those cups! Thanks so much for sharing.
Ooh, how cute! Adorable colorful cups!
Theresa
Stunning colors an love the layout.
What a colorful lovely card!! Amazing background! Lovely cups with the hearts! Thank you for the tutorial!!
Hello Esther:
There is just something about stacked cups that I'm always drawn to in an image. You did such a lovely job with yours. Very rich tones and lovely accents.
Blessings,
Karen L
Beautiful background & love the stack of cups!
Great techniques on this, fabulous!
I am in love with your faux wood! Love the bold colors and design of this card, Esther! I need to get makin'! Hugs!
LOVE this card! the colors are amazing and i love the texture!
That’s a great background! I’m going to have to try this! Love the teacups and the colors too! Pinning for future reference!
Such a gorgeous and cheerful card, Esther. Thanks for the tutorial on how to create that fabulous background.
its wonderful card!
Esther... that is amazing card! I love your stacked cups and background. Thanks for showing us how to create it, my friend (I pinned it to try later 😉)
Love the vivid colors but especially love the hand made wood background! Thanks for the helpful tutorial and thanks for joining us at Paper Players!
Love how you did the wood grain background, and the stencil on the cup is cute, pretty coloring!
Thanks for sharing your technique, the background and cups are beautiful.
WOW, Ester, that is one terrific card and such a wonderful technique.
Will have to try this!!
Awesome cups and card Esther, your woodgrain background panel looks amazing
great project!! Thanks for playing along with us this month at STAMPlorations!!!
Great card! I love the background and those colorful cups. Thanks for sharing your card at Mix It Up Challenge Blog! Hope to see you again soon!! HUGS!
Ann DT
Post a Comment