Thursday, March 31, 2011

Calendar Challenge - March

Time to upload the calendar pages for March of next year.  The above one is my CD Case calendar.  Doing this one in a Scripture theme - chose a verse about growing since SRING started this month.  Would you believe that the background paper is actually wrapping paper?  A lady from church regularly contributes to the Disabled Veterans and therefore receives wrapping paper and stuff from them. She likes to pass it on to me since  in her words "you make pretty stuff."
Other supplies used:
  • White ribbon
  • Felt tip pen
    • faux stitching and verse
  • Ornate Labels # 3 - Sizzix
  • Homemade Dew drops
  • Pink nail polish
    • colored dew drops with
  • old pattern
    • butterfly
Here's a closer view of that butterfly --- it has several layers and was cut out and embossed with a Provo Craft die/embossing folder set I have.
Here's the quilted calendar for March
 I used spring papers - mainly pinks/purples for my quilt this month.  Added a big 3D ribbon flower to the center to make the page "pop."
The flowers in the center are Iced Got Flowers with a rhinestone in the middle.
Here's a little closer view:
I plan to give these completed calendars as gifts this coming Christmas.
Click here to see what a friend made for her calendar gift for the month of March.
This post linked to:
Thrilling Thursday
Free For All at Sassy Sites  
Crafty Friday Mash Up   
Crafty Saturday

Wednesday, March 30, 2011

Paris /Shabby Chic Bathroom - Shelf - Picture Frame

I spotted this shelf in a thrift store for something like $2 or $3 dollars. The only trouble was -- it was bright yellow!
Nothing that a $1 can of white spray paint from Wal-mart couldn't fix though...
It fits perfectly under my Black and White memory board, and I couldn't be more pleased with the results!
I added the Bride and Groom from my Dreamsicle collection, a pretty little plate (from the thrift store - cost 75 cents), a cherub, and button card.  
The picture frame on the shelf started out looking like this:
But once again - a little spray paint (pink this time), and an image from Clearly Vintage changed the look completely!
Bathroom Makeover
Post #1
Post #2 
Post #3

This post linked to:
Whatever You Want Wednesday
Penny Pinching Party
Transformation Thursday 
Thrilling Thursday
Free For All at Sassy Sites  
Whipperberry Friday Flair
Feathered Nest Friday  
Thrifty Things Friday

Tuesday, March 29, 2011

Paris Bathroom - Pedestal

This pedestal is the ugly brown thing on the left of the before picture below. I got it at a thrift store for something like $1.49 (or was it 98 cents?).
A little pink paint did wonders towards transforming it into a "item of beauty."
 It was my 8-year old daughter who noted that it looked something like a bird bath and that gave me the idea to put this cute little ceramic bird (50% off at Michael's) on the top and surround it with some pink/clear "pebbles."
Bathroom Makeover
Post #1
Post #2

This post linked to:
Handmade Tuesday 
Whatever You Want Wednesday
Penny Pinching Party

Monday, March 28, 2011

Paris Bathroom -- Wall Art

If you missed last Friday's post - you don't know that I'm redecorating my bathroom in a Paris/Shabby Chic theme.  Sharing my do-it-yourself projects on here for all to see (and maybe be inspired by). I mentioned that I shopped LOTS of thrift stores -- the above frame was one of my finds...it started out like this:
You can see that I paid $1.98 for it -- and since it was the perfect color I only needed to add a vintage image from the Graphics Fairy and a piece of ribbon from my stash to complete the look I wanted. Simple, Easy, and Cheap - I'm more than pleased with the outcome!
 I found that little rose plate at a thrift store for $1 -- it went perfectly and I love it!
This post linked to:
Graphics Fairy Brag Monday
Craft Catwalk
Made With Love Monday
More The Merrier 
Making Monday Marvelous 
Transformation Thursday

Friday, March 25, 2011

Paris Bathroom - Button Cards

 This is the first of many posts about my newest project....redecorating my bathroom in a Paris theme. We usually try to do a small home improvement every year at tax return time, and this year I picked my bathroom to re-decorate.

In an effort to make my money stretch as far as it possibly could (and because I LOVE to make things!!) I decided to include as many do-it-yourself items as possible.

  Between
  • Michael's 50% off aisle of Paris themed decor
  • Marshalls clearance
  • Ollies Bargain Outlet
  • a 1/2 yard of fabric from JoAnn's
  • LOTS and LOTS of thrift stores 
  • Free Vintage Graphics on-line
  • AND pulling a few things from other parts of my house
--I managed to find lots of bargains and keep my cost to a minimum.

I can't wait to share all my do-it-yourself projects with you --- I'm having so much FUN creating them.

Today I'm starting with a black hanger and the button cards I made to hang on it. I decoupaged an image from the Graphics Fairy (you're going to be seeing that name a lot in this process -- I love the images there!) onto the top of the hook.
Originally I thought to hang some keys on this, but then another project turned out to be perfect for the keys.  A bright idea hit me on Monday morning - why not make some vintage button cards and sew some of the vintage looking buttons from my collection on them?  Here are the button cards I came up with.
The cards on the hanger -- from here, layered on images from Graphics Fairy
Same button cards, with image from Magic Moonlight Free Images
 Same button cards, with image from Vintage Scrapbooking
Free button card from here - fun buttons from my stash!

In my search for free button cards I stumbled across some interesting (to me at least) sites --- I'll share them with you in case your interested in making some for yourself! 

 Free Printable Button Cards
  1. Just Something I Made
  2. Martha Stewart
  3. Friday freebie button card
  4. Graphics Fairy
  5. 30 Handmade Days
  6. Printable Valentine Cards - 1 button card
A cute digital set of 12 for sell ($3.00) here
I bought this set and highly recommend.  Not only do you get the button cards, but you get free digital buttons, AND it includes transparent ones so you can layer them!! 

Here is a link from the frugal crafter on making faux buttons and homemade button card!


Here are a few links to adorable cards featuring buttons:

  1. Stamped In His Image
  2. Heartwells
  3. Sew Sweet Vintage
  4. Linaloo
  5. Stamping With Buttons
  6. Cute little Button Wreath
  7. Cute button embelishment
One last fun link ---edible shortbread buttons 

Stay "tuned" for more do-it-yourself Paris Bathroom Projects to come!

This post linked to:
Crafty Friday Mash Up
Friday Flair 
All Things Domestic 
Graphics Fairy Brag Monday
Craft Catwalk
Made With Love Monday
More The Merrier 
Making Monday Marvelous 
Take A Look Tuesday 
Tip Junkie handmade projects

Thursday, March 24, 2011

Masculine Card Pockets

Had a lot of fun combining some images from the Graphics Fairy into a masculine collage. Several men that needed thanked for being a part of a "miracle" in our lives and one that needed a birthday card.  I decided to make them assembly line style - mostly the same with only a few minor differences.
The above image combined a tag image, a background image, and the globe --- all from Graphics Fairy.   I added the text with my computer.
This tag has a Tim Holtz truck stamped on it.
This one uses the tag, the world, and a car from the Graphics Fairy.
The other supplies used were:
  • Dictionary Page
  • Pencil eraser
    • polka-dots on tag made by "stamping" with brown ink and a pencil top
  • Twine - Cotton Thread
  • Brown/Rust Cardstock
  • Eyelets
  • Black Staz-on ink
Here's the birthday envelope/tag card along with a loaf of banana bread....changed the sentiment on this one just a bit ----
One more pocket card --this time in a different color/style altogether.
I shaped the tag a little different on this one.
Supplies:
  • Blue/White cardstock
  • Blue Eyelts
  • Images from the Graphics Fairy
  • Cotton "twine"
  • Pencil top (to make the blue polka-dots)
This post linked to:
Trasformation Thursday
Thrilling Thursday
Craft Catwalk 
Friday Flair 
Graphics Fairy Brag Monday
Take A Look Tuesday 
Handmade Tuesday 
Free For All at Sassy Sites
    Tip Junkie handmade projects

    Wednesday, March 23, 2011

    Little Purse Gift

    Here's another version of the little purse I showed you Monday.  This little gift was for my mother-in-law who didn't get to come along on the trip with the group....sort of a "miss you - sorry you didn't get to come" gift.
    The notebook, bath fizz, and pretty soap (inside the purse) were all purchased at Michaels (some of it 50% off).
    Here's a view of the soap that's inside the purse.  I made the purse before I went to Michaels, and tried to pick accessories that matched it.  Was really pleased with how well they matched when I got them home.
    Supplies:
    • Designer Paper
    • Creme Cardstock
      • heart closure
    • Purple Got Flowers
      • on heart
    • Square rhinestone brad
      • center of flowers
    • Purple cardstock
      • little tag
    While I still can't find the template I used for this -- here is a link  (courtesy of Mel Stampz)  to quite a few cute templates to pick from!
    This post linked to:
    Whatever You Want Wednesday
    Friday Flair

      Tuesday, March 22, 2011

      In Memory

      A sweet friend of mine lost her mother a year ago today.  I wanted to make her a little gift to let her know I was thinking of her on this difficult anniversary.  Both she and her mother enjoy(ed) birds/flowers/outdoors, so I geared my gift in that direction. I bought her a Birds N' Bloom magazine and made her a little birdhouse (full of Reese Eggs) to go along with it. The birdhouse template came from Nichole Heady at Papertrey Ink -- I "fell in love with it" the minute I saw it.

      I added a twig, some Iced Got Flowers, and a birdie to the front.  Also added a strip of border to the roof with my Threading Water border punch.
      I attached the roof on the left side with glue and on the right with a ribbon, so that you can open it and get the Reese Eggs out!
      Here's the card I made to go along with it:
      Supplies:
      • Image from the Graphics Fairy
        • Have I said yet that I love her site?!?
      • Circle/Scallop Circle Nestabilities
      • Purple/Pink Cardstock
      • Purple Decorative Ribbon
      • Purple Iced Got Flowers
      • Pink/Purple Rhinestones
      • Threading Water Boarder Punch (Fiskars)
      • Top of a pencil
        • Inked the eraser with purple ink and stamped it on the card to make those polka-dots!!
      •  
      This post linked to:
      Tip Me Tuesday
      Take a Look Tuesday
      Whatever You Want Wednesday
      Penny Pinching Party 
      Transformation Thursday
      Thrilling Thursday  
      Craft Catwalk

        Monday, March 21, 2011

        Welcome Gifts

         We recently entertained a music group overnight -- I wanted to welcome them to our home with a little gift.  The group that came consisted of 5 guys and 1 girl, plus my father-in-law and two sister-in-laws.  I gave all the "kids" a big pack of Extra Gum and Reese's Peanut Butter Cup Egg.
         I made three little purses to put the girl's treats in.
         I cut two strips (1 inch wide) for the handles and glued them back to back so there wouldn't be a white side on them. I attached them to the side of the purse with a little square brad.

        Here you can see the little tag attached with curly ribbon and the heart closure on the front.  The top flap tucks inside the top of the heart. I embossed the hearts with the Victoria embossing folder (Provo Craft).
        These were a super fun way to give my little gift - and the girls loved them.
         The guys were tied up with curly ribbon and had a personalized tag on top.

        BTW- I usually bookmark places I get templates from until I link to them on my blog....but for some reason I didn't do it with the above purse template and though I've searched and searched I can't find it again.  So if you know where it came from -- leave me a comment and let me know..thanks!

        Saturday, March 19, 2011

        Sunny Lemon Bars

        Sunny Lemon Bars
        Crust:
        1 1/2 cups flour
        3/4 cup butter or margarine
        1/3 cup confectioners' sugar
        1/8 teaspoon salt
        Preheat oven to 350 degrees.
        Spray a 9 inch square baking pan with cooking spray
        In medium bowl: beat flour, butter, sugar, salt till soft dough forms.
        Press dough into the bottom of prepared pan. 
        Bake crust 20 minutes - remove from oven.
        Filling:
        3 eggs
        1 1/2 cups granulated sugar
        3 Tablespoons flour
        1/3 cup lemon juice
        In medium bowl: combine eggs, sugar, 
        flour, and lemon juice.
        Mix thoroughly
        Pour mixture into baked crust
        Bake until center is firm - 20 minutes
        Remove from oven and dust with powdered sugar.
        Cool completely
        Cut into squares and enjoy!
        This post linked to:

        Friday, March 18, 2011

        Easter Tree

        Time to change the Valentines Tree into a Spring/Easter tree.  I didn't hand-make anything on this one --just used eggs, bunnies, flowers to give it that spring look.  I'm always dismayed when my lights burn out 1/2 through the "season" and I have to un-decorate and put new lights on.  I picked up a box of lights on clearance after Christmas - they have the white wire instead of green.  I wasn't sure I would like them on my green tree, but found that they actually add to the spring feel of the tree.  These are LED lights - so I'm hoping the box was right when it says they last 5 years....getting tired of the lights burning out so quickly.
        We entertained a school quartet last week-end and the first thing out of the baritones mouth when he walked our house was, "Oh I love the tree!"  Seems there are quite a few of us that can't bear to take all the lights/greenery down after Christmas!
        This post linked to:
        Free For All Friday
        Craft Catwalk

        Thursday, March 17, 2011

        Altered Muffin Tin

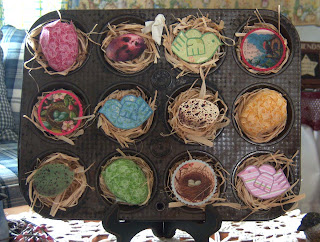
         I've seen a few muffin tins turned bird's nests on-line of late, and since my living room is done in a bird theme I thought it would be fun to try making one myself.  Can you believe that the very day I decided to shop for an old muffin tin (at the thrift store) I found one for $1?!  I can't --- it usually takes me a while to find what I'm looking for!
        I started by hot gluing a small "nest" of raffia ribbon in the bottom of each cup.
         For the eggs I took regular plastic Easter eggs and covered them with fabric strips.
        The paper eggs and bird nest images are from the Graphics Fairy. The circular ones were cut with a 2 inch circle punch and layered on a coordinating piece of cardstock cut with the scallop circle nestabilities.
        I also made three little paper birds to sit on three nests.  There are 3 fabric covered eggs, 3 paper eggs, 3 birds, and 3 circular nest pictures.
        I started to make it something to hang on the wall - that's why you see a knotted ribbon at the top - then I got the "bright idea" to use a stand and add it to my coffee table decor.  I left the ribbon on as I like it and who knows it may end up hanging on a wall yet (as much as I change things around!!!).
        This post linked to:
        Paisley Passions Thrilling Thursday
        Transformation Thursday
        Who Made What Weekends - Party #14 
        Free For All Friday 
        The Weekend Review at Humble Homemaking 
        Crafty Friday Mash Up
        M.M.M. Monday 
        Brag Monday at the Graphics Fairy 
        Inspire Me Monday
        craft