Friday, July 30, 2010

Adult Journal Jar

After I made the kids journal jar (yesterday's post), I got to thinking how fun an adult journal jar would be.  (My friend "Sophia" needs one....as much as she LOVES to write!!).
So here's my 1st go at an Adult Journal Jar and Journal
Here is the jar full of prompts...
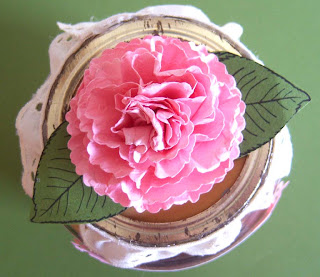
The rose on the top of the lid -- made using the Nestabilities Flower tutorial on the side of this blog and MS leaf stamp.
A close up of the journal jar recipe (I found it somewhere on-line - can't find it again for the life of me!). I liked the wording on it -so I printed it off for the front of my jar.
 The matching journal has another one of those vintage images from an outdated calendar.
The curled journal prompts - printed on pattern paper.
Supplies used on this journal and journal jar include:
  • Jar
  • DP - ??
  • Eyelet Lace - around jar lid
  • Pink/Green Cardstock
  • Script Embossing Folder (I embossed each layer of the flower before assembling)
  • MS Leaf Stamp
  • Vintage Calendar Image 
  • Diamond Border Punch (Fiskars) - on jar label

Thursday, July 29, 2010

Journal Jar

Here's a fun "gift" I made up for my daughter called a Strawberry Shortcake Journal Jar!
Right now it has 50 prompts in it --- we'll refill it when we run out.  Here's a view that shows you the lid and the little strawberries on it (cut from the same ribbon that's wrapped around it).
Of course what good is a journal jar without a journal????  Here's an altered (15 cent) notebook to match...
 (After I took the above pictures - my daughter decided she'd like her prompts printed on pattern paper -- so I ended up with 91 prompts - printed on pattern paper and curled around a pencil for added interest!)

I made my journal prompts in such a way that I can participate with her.....figured it would be more fun to do it together.  So.....here's my journal
I found these three Victorian calendars at a thrift store (for a few cents) a while back -- the images work beautifully for altered notebooks!
BTW- My friend is the one who showed me how to alter those notebooks.  You take the wire coil out --- cover the existing cover with your choice of paper/embellishments -- turn it over so you can see the existing hole-- use them as a guide to punch through your new cover --- put the wire coil back through and wa-la!

Here are the supplies I used on the journal jar and S.S. journal
  • Image from here
  • Circle/Scallop/Blossom II nestabilities
  • Wide strawberry - fabric ribbon
  • Pink Ric Rak
  • Red stitched ribbon
  • Red/Pink/White Cardstock
  • Alphabet stamps (K & Company)
  • Floral Borders (Autumn Leaves - Stampology)
Here are some links to help you get started in making your own journal prompts
  1. Child's Journal Jar (this site has printable journal prompts --- If you don't have DSL it's a bit time consuming though)
  2.  Can Teach Journal Prompts
  3. Journal Writing Ideas from Teachers.Net
I plan to make some more journal jars -- for adults so I'll include a few journal prompt links on an adult level
  1. Recipe for My Life's History
  2. All About Me Journal Prompts
  3. Family History Prompts 

    Wednesday, July 28, 2010

    Cowboys and Horses

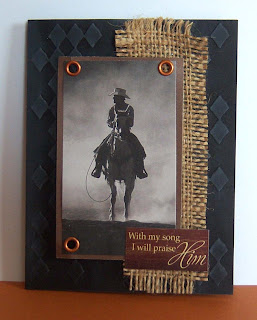
    Another card using a strip of that cheap burlap!  This time I chose a western theme --- and I'm very pleased with how it turned out.
    Supplies used:
    • Cowboy picture from a 2008 page a day calendar (I got it after the start of the New Year for a few cents --- lots of images to use on cards)
    • Brown cardstock (matted picture on it)
    • Black cardstock (card)
    • Strip of burlap (frayed on edges)
    • Copper eyelets
    • Diamonds in the rough embossing folder (I lightly inked over the embossing with a white stamp pad)
    • Sticker (The Paper Studio)

    Tuesday, July 27, 2010

    Menu Board

    As I mentioned yesterday -- my s-i-l and I went thrift store shopping last week.  This was one of her finds that she decided she didn't have room for so offered it to me.

    To be honest, I wasn't sure at first if I wanted it till I thought about it for a minute --- and thought about all the "decorating possibilities."  By the time we got back to my house I had decided to make it something I could change with the seasons.  (Those closest to me know how I LOVE changing things!!!) I planned to use Velcro to attach my  decorations with so that I could remove them and change them from time to time.
    You'll be seeing this board again.......but here's the first "installment" of my seasonal menu board.
    This is to be my August (and maybe September -- if I don't change it again before then) menu board.
    Side note: I wanted to cover those little holes at the top and bottom, but Velcro would hardly work on those fine curves -- so I used three little pieces of sticky tab as they aren't permanent but are fairly easy to remove.
    Here's the supplies I used:
    • Spellbinders Shapeabilities Flourish Accent (accents at top and bottom)
    • DP - Classics (K&Company) (Welcome "sign" at the top)
    • K & Company Alphabet stamp set
    • Blossom II nestabilites
    • Sunflower stamp (Heartfelt Creations)
    • Brown ink
    • MS leaf punch
    • MS branch punch
    • Brown beads (center of sunflowers)
    Here's a close up of the sunflowers so you can see the details....the small flower first and then the larger one
    A view of it sitting on my kitchen counter...

    Monday, July 26, 2010

    Asian with burlap

    My s-i-l was here this past week-end and we managed to squeeze a little scrapin' time in on Friday night.... AFTER we had visited some local thrift stores and found a nice sized piece of burlap for $1!!  Had several things we wanted to try (stampin' on fabric, using the burlap, making faux postage stamps, etc.) -- incorporated two of them on this card....
    Supplies used:
    • Asian by Design Stamp set (Inkadinkadoo)
    • Stamp tutorial from Splitcoast
    • Versa Mark (stamped lanterns in)
    • Green/Red Chalks (After stamping in Versa Mark - colored with chalks)
    • Green Eyelets
    • Piece of Burlap (frayed the edges)
    • Stamp edge scissors
    Now just in case you have a "oops"  (like my s-i-l did) and need to cut one of the stamps off (the versa mark  smeared) - you can always salvage it by stamping a sentiment (this one from Studio G).

    Wednesday, July 21, 2010

    Using Fabric

    I've been wanting to try stamping on fabric for some time now, but I didn't have any.  When I bought the pack of handkerchief's to make the sheet for the dollhouse bed I posted yesterday, an idea struck.....why not try stamping on them?  So I did.....the above card is proof that it works and I really like the "feel" of this card with the fabric image.
    Supplies used:
    • Handkerchief
    • Circle/Scallop Nestabilities
    • Old Dictionary page (flower)
    • Blue ink (flower)
    • Felt (center of flower)
    • Sizzix, build a lilac die (felt flower)
    • Button (flower center)
    • Lanterns Clear Stamp set (Inkadinkadoo)
    • Black Felt Tip Pen (Faux Stitching)
    • White Paint (Dots around image)
    • Spellbinders Shapeabilities Flourish Accent
    • Misc. Beads

    Tuesday, July 20, 2010

    Something Different -- Doll house furniture!

    I discovered something about myself yesterday.....I have more patience than I thought I had!!  Reason being --- I was able to put together a "Queen" sized bed for dollhouse people!  My daughter and I recently checked out Tiny Treasures - Amazing Miniatures  You Can Make (American Girl Library), and I promised her we would make some of the projects together this week for her dollhouse.  I envisioned making the simple braided rug out of embroidery floss, but my daughter wanted a little more complicated project (this bed) to be the first project.
    Have to admit it was a lot of fun to make,and we are both MORE THAN PLEASED with the way it turned out! 
    Here's a view from above with the bed spread open so you can see the flat bottom sheet underneath.
    A view of her Melissa and Doug dollhouse people laying on top the bed so you can see it's more than adequate!
    While I can't tell you exactly how I made everything (it's not my original idea, but from a copyrighted book).... I will list the supplies I used.  I didn't  follow the book exactly,  but based my ideas on the twin bed they had pictured.
    Supplies used:
    • Cereal  box (base of bed)
    • White handkerchief -(sheet/long pillow)
    • Batting (inside pillows)
    • Sour Cream lid (headboard)
    • Bits of leftover lace (edging on lg. pillow/bedspread)
    • Blue rick-rack - along base of bed
    • Two coordinating (blue) material scraps (bedspread/sq. pillows/ headboard)
    • Singer Pixie Sewing Machine
    • Glue Gun
    Just for fun here's a link to Family Fun and a page they have about recycling things to make dollhouse furniture.
    BTW - we did do the braided rug ....here's what it looks like next to the bed
    Supplies used on the rug:
    • Dk. Blue/Lt. Blue/White Embroidery floss
    • Felt
    • Hot Glue

      Monday, July 19, 2010

      Dear Friend


      Made this card (yesterday afternoon) using my new sewing machine....so fun to have a little machine that's lightweight and easy to use on cards!
      Supplies used:
      • Clip art from Clearly Vintage (Feb. of this year)
      • Scallop Nestabilities
      • Script Embossing Folder
      • Diamond Border Punch (Fiskars)
      • Dear Friend stamp (Studio G)
      • Brown Ink
      • Homemade roses -- uses mini rose tutorial (under tutorial links)
      • Red Glitter (on roses)
      • Red/Tan/Green Cardstock
      • Singer Pixie Sewing Machine

      Saturday, July 17, 2010

      Award

      My sister in law gave me this award earlier this week, and I've just not had time to post it or
      1)Thank the person who gave it to me
      2)Share 7 things about myself
      3)Pass it on

      Thank you Pam, for the award...now 7 things about me (having to do with paper crafts since that's what this blog is about for the most part)
      1. I LOVE clearance aisles full of paper crafting goodies!
      2. I "rank" stores according to how "good" their clearance aisle is!
      3.My favorite tool is my Cuttlebug
      4. I love anything floral (papers, embellishments etc.)
      5. I save ALL my paper scraps (right down to the tiniest piece) and have them organized by color
      6. I enjoy doing mini scrapbook albums
      7.  I find it twice as much fun to "scrap" with some else as when I do it alone!

      And now to pass it on to some fellow paper crafters who I've followed for a long time now
      1. Frugal Ideas from the Parsonage
      2. Create With Me
      3. Creations by Patti
      4.  Valita's Fresh Folds

      Friday, July 16, 2010

      More Felt Fun

      So I wanted to try something else with the felt, but I only have a couple Sizzix dies so here's what I came up with this time:
       Supplies used:
      • Image - from a calendar that I picked up from Michaels for a few cents after the start of the new year
      • Sizzix Locket, Heart die
      • Green/"Yellow"/Cream Felt
      • Homemade Roses (tutorial here)
        • flower punch
        • leaf punch
        • hot glue gun
      • Happy Anniversary Stamp (Studio G)
      • Black Embossing powder
      • Green Ribbon
      • Hat Pin and Misc. Beads
      • Green/Cream Cardstock

      Thursday, July 15, 2010

      Felt Flowers

      Some time back I got a bunch of felt at a thrift store for 99 cents.  Been wanting to try putting it through the Cuttlebug for some time, and finally got a chance.  Found that it worked best with Sizzix dies -- the Provo craft dies didn't want to cut it even after running it through 4 times.
      The above cards were the simple product of my experiments -- the felt flowers were cut out with the Sizzix, Build a Lilac die.  I found that I could also flip them and use them as vertical cards -- pictured below...

      Supplies used:
      • DP - Home (My Mind's Eye)
      • Sizzix, Build a Lilac die
      • Provo Craft die (don't know the exact name)
      • Felt
      • White Pearl Iridescent Paint (centers of flowers in corners)

      Wednesday, July 14, 2010

      Tree Bark


      I have wanted a stamp to do tree bark for sometime now......seeing all the cool cards on Splitcoast can be thanked for that!  Anyway, imagine my surprise (and delight) when I opened my pack from Creative Stamping this month to find no less than four tree stamps (another love of mine) and a TREE BARK stamp!! I was so happy, and didn't waste any time at all inking them up. 
      Supplies used:
      • Out on a Limb Tree and Bark Stamps (Creative Stamping)
      • Red/Green/Brown ink
      • Tan/Green/Red/Cream Cardstock
      • Leaf Punch
      • Diamond Border punch (Fiskars)
      • Spellbinders Shapeabilities Flourish Accent
      • Green Rhinestones
      I'm entering this card in the Stampin' Sisters in Christ challenge for this week which is: Make a card that symbolizes what brings you rest or peace.
      There is nothing that draws my heart to worship my Creator and brings me peace and rest like being outside  enjoying God's beautiful creation! Something about being away from "man made" noise and the things inside that call for my attention that quiets and refreshes my spirit.  My favorite time is after dark when all is quiet and the moon and stars light up the evening sky!

        Tuesday, July 13, 2010

        Perfect "Pear" Anniversary

        Here's an anniversary card I made last week for the "Perfect Pear" (Pair).
        Supplies used:
        • DP - Classics (K&Company)
        • Pear Stamp (Rubber Stampede)
        • Black Embossing Powder
        • Diamond Border Punch (Fiskars)
        • Small Alphabet stamp set (Studio G)
        • Larger Alphabet Stamp Set (????)
        • Small Flower Punch
        • Green/Lt. Blue/White Cardstock
        • Script Embossing Folder (provo craft)

        Monday, July 12, 2010

        All Kinds of Thanks


        Supplies used:
        • All stamps Studio G ($1 stamps from Michaels)
        • Versa Mark (all stamps stamped with this)
        • Chalks (on butterfly/birds/dragonfly images)
        • Yellow & Pink Embossing Powder  on "all kinds of thanks"
        • Black Embossing Powder (circle of thanks/arrow)
        • Diamond Border Punch (Fiskars)
        • MS Daisy Dot Border Punch (inside border)
        • Small Brads
        • White/Yellow/Blue/Pink/Green Cardstock
        Since my card front was so wide I would have had to use a separate sheet of cardstock for each card (I made three of each design).  Rather than cut that much up carstock I solved the problem this way......

        I pieced a coordinating piece of paper (punch with MS punch) to the right side.The pink ones have a green piece attached to the right side.

        Friday, July 9, 2010

        Book Card


        Easel book cards have started popping up on Splitcoast since Valita's post on them the other day.  I do not own the nestabilites set that makes them, nor do I wish to purchase it....simply because the shape is a fairly simple one to draw up and resize according to the need.  My friend Christa (who's a lot more patient and precise than I am) drew it up and sent it to me the other day.  Above is my first use of the template she drew --- it's not the 3-D book (or easel card) that Valita created (I'll try one of those later) -- but my own spin on a book card.
        Supplies used:
        • Book template
        • DP - Classics (K & Company)
        • Blue/Cream Carstock
        • Scallop Nestabilities (for flower - tutorial here -- turned the top layer wrong side up so as to not have a lot of white showing on my one sided DP)
        • Leaf Die (Provo Craft)
        • MS Branch Punch
        • Butterfly Stamp (Creative Stamping)
        • Black Embossing Powder
        • Chalks (on butterfly)
        • Textile/Swiss Dots/Script Embossing Folders
        • Small Rose stamp (inside - no details on it)
        • Blue Ink
        • Spellbinder Shapeablilities Flourish Accent
        I made it so the top book opens to reveal a smaller book to write your little note on inside.  Here's a photo of the open book...

        Entered in the Stampin' Sisters in Christ challenge  --- use red or blue (or both) on your card.

        Thursday, July 8, 2010

        The Blues

        I've seen this technique around where you punch your flowers -- roll them/squish them in your hand till you "break the fibers" and then pull them apart.  I got two flowers out of each of the one's I punched -- they're thin- sort of like mulberry paper.  I've been working on these flowers over time (when I need something mindless to do while talking on the phone or something) and had quite a little stash on my desk.  Decided it was time to make something out of them, and this card was the product of that.  I glued them over the stamped daisies.
        Supplies used:
        • Small 5 - petal flower punch
        • Butterfly Fancy --Daisy/Butterfly stamps from Creative Stamping
        • Black embossing powder (on butterfly)
        • Blue/Yellow chalk (colored butterflies)
        • Script embossing folder (white paper)
        • Forever border stamp (Autumn Leaves - Stampology)
        • Yellow Embossing powder (on border stamp)
        • Diamond Border bunch (Fiskars)
        • Lt. Blue/ Dk. Blue/ White Cardstock

        Tuesday, July 6, 2010

        Quilted Faith


        Supplies Used:
        • DP - Classics K & Company
        • MS branch punch
        • Blossom II nestabilitie (used to make the big flower using this technique)
        • Square punch (photo corners)
        • Rose technique listed here (note: when using patterned paper that is NOT double-sided I reversed the inside flower so that the white part was inside and the pattern was outside.  This way you don't see as much white inside the rose)
        • Faith sticker from the Paper Studio
        • White/Red/Brown/Tan cardstock
        • Felt tip black pen (faux stitching)

        Monday, July 5, 2010

        A Wreath

        Supplies used:
        • Sizzix, build a lilac die (for all those flowers around the wreath)
        • MS Daisy Dot punch (the centers of all those flowers)
        • Light/Purple Cardstock (I placed a dk.purple small flower inside a light big purple and then reversed it on the next one  -- all the way around)
        • Glue Gun (since the glue dries quickly it was easier to assemble the wreath with hot glue)
        • Purple fiber (wove into the flowers)
        • DP - Classic K & Company
        • Square punch (corners)
        • Small alphabet set (Studio G)
        • Purple Ink
        • White Pearl Iridescent Paint (centers of flowers in corners)

        Friday, July 2, 2010

        Hydrangea Card #2

        I love the hydrangea look (with the build a lilac die) and thought I'd try it with patterned paper instead of solid.  Here's the result --- I think it gives the flower more "character."
        Supplies used:
        • All DP - Classic K & company
        • MS leaf stamp
        • Sizzix - build a lilac die
        • Blue ink pad (stamped leaf and inked edges of flowers)
        • White Pearl Iridescent Paint (centers of flowers)
        • Butterfly punch
        • Textile Embossing Folder
        • Blue/White Cardstock
        Entered in the Stampin' Sisters in Christ challenge -- use red or blue (or both) on your card.

          Thursday, July 1, 2010

          July Bulletin Board

          Here is my bulletin board decoration for the month of July.

          Supplies Used:
          • Clip art from here, here, and here
          • Red Cardstock
          • Tan DP
          • Mini Flag
          • Clip art from my print shop program
          • Fiskars around the page punch - tisket/tasket